
This guide will walk you through integrating Anthropic Claude AI into a Spring Boot application using Spring AI. We'll cover:
- Introduction
- Project Setup
- Configuring the API Key
- Creating a REST Controller for Claude AI
- Testing the API with Postman
- Running Unit Tests
- Final Project Directory
1. Introduction
Spring AI provides the underlying support for the Anthropic's Claude AI models, enabling spontaneous integration to natural language processing (NLP) functions in spring boot applications. Anthropic developed Claude, a family of AI models optimized for conversational AI, content generation, and reasoning tasks. Known for their safety, interpretation and reliability, the Claude model (eg Claude3 and Claude 2) is widely used in chatbots, intelligent assistants and content automation.
Spring AI provides an abstract layer to interact with the Claude model through Anthropic API, to simplify the integration process for AI developers. This provides an easy-to-use configuration through application.yml, allowing developers to specify model settings, API key and response preferences. Additionally, Spring AI includes a Rest client to handle communication with the Claude API, making it simple to send prompts and receive responses in a structured manner.
With Spring AI, developers can avail Claude AI for various NLP capabilities, including text generation, streaming responses, and chat-based interactions. The framework also supports customizable parameters like temperature (which controls response randomness), max-tokens (limiting response length), and top-p (adjusting diversity in responses). These features make it easier to correct the behavior of Claude models to suit specific application requirements to ensure high quality AI-driven interactions in Spring Boot applications.
2. Project Setup
Step 1: Create a Spring Boot Project
You can create a Spring Boot project manually or use Spring Initializr.
Select the following dependencies:
- Spring Web (for REST APIs)
- Spring AI – Anthropic Claude (for AI integration)
Step 2: Add Dependencies in pom.xml
Modify your pom.xml to include the required dependencies:
<?xml version="1.0" encoding="UTF-8"?>
<project xmlns="http://maven.apache.org/POM/4.0.0"
         xmlns:xsi="http://www.w3.org/2001/XMLSchema-instance"
         xsi:schemaLocation="http://maven.apache.org/POM/4.0.0 https://maven.apache.org/xsd/maven-4.0.0.xsd">
    <modelVersion>4.0.0</modelVersion>

    <parent>
        <groupId>org.springframework.boot</groupId>
        <artifactId>spring-boot-starter-parent</artifactId>
        <version>3.4.4</version>
        <relativePath/>
    </parent>

    <groupId>com.example</groupId>
    <artifactId>claude-ai-integration</artifactId>
    <version>0.0.1-SNAPSHOT</version>

    <properties>
        <java.version>17</java.version>
        <spring-ai.version>1.0.0-M6</spring-ai.version>
    </properties>

    <dependencies>
        <!-- Spring Boot Web Starter -->
        <dependency>
            <groupId>org.springframework.boot</groupId>
            <artifactId>spring-boot-starter-web</artifactId>
        </dependency>

        <!-- Spring AI Anthropic Claude Integration -->
        <dependency>
            <groupId>org.springframework.ai</groupId>
            <artifactId>spring-ai-anthropic-spring-boot-starter</artifactId>
        </dependency>

        <!-- Spring Boot Starter Test -->
        <dependency>
            <groupId>org.springframework.boot</groupId>
            <artifactId>spring-boot-starter-test</artifactId>
            <scope>test</scope>
        </dependency>
    </dependencies>

    <dependencyManagement>
        <dependencies>
            <dependency>
                <groupId>org.springframework.ai</groupId>
                <artifactId>spring-ai-bom</artifactId>
                <version>${spring-ai.version}</version>
                <type>pom</type>
                <scope>import</scope>
            </dependency>
        </dependencies>
    </dependencyManagement>

    <build>
        <plugins>
            <plugin>
                <groupId>org.springframework.boot</groupId>
                <artifactId>spring-boot-maven-plugin</artifactId>
            </plugin>
        </plugins>
    </build>
</project>
3. Getting the Anthropic API Key
To use Claude AI, you need an API key from Anthropic.
Steps to Get Your API Key
- Sign Up on Anthropic
Go to the Anthropic Console and create an account. - Generate API Key
- Click on your profile icon.
- Select API Keys.
- Click Create Key, name it, and generate the key.
- Copy and store it securely.
4. Configuring the API Key in Spring Boot
Now, let's configure the API key in application.yml.
📄src/main/resources/application.yml
pring:
  ai:
    anthropic:
      api-key: YOUR_ANTHROPIC_CLAUDE_API_KEY
      model: claude-3 # Choose the appropriate Claude model version
      max-tokens: 1024 # Limits response length
      temperature: 0.7  # Controls randomness
      top-p: 0.9        # Diversity of responses
      stop-sequences:
        - "END"
      system: "You are an AI assistant that provides helpful responses."
streaming: false # Enable real-time streaming response (true/false)| Property | Definition |
🔑 api-key | The API key used to authenticate requests to Anthropic Claude AI. |
🤖 model | Specifies the Claude AI model version (e.g., claude-3, claude-2). |
🔢 max-tokens | Limits the maximum number of tokens (words/characters) in the AI response. |
🎲 temperature | Controls randomness in responses (lower = predictable, higher = creative). |
📊 top-p | Adjusts response diversity (higher = more varied, lower = more focused). |
🛑 stop-sequences | Defines specific words or phrases that stop the AI response generation. |
💬 system | Provides system instructions to shape Claude's behavior and response style. |
⚡ streaming | Enables (true) or disables (false) real-time response streaming. |
Replace YOUR_ANTHROPIC_CLAUDE_API_KEY with your actual API key.
5. Implementing a REST API for Claude AI
Now, let's create a Spring Boot REST Controller to communicate with Anthropic Claude AI.
ClaudeAIService.java (Service Layer)
package com.example.service;

import org.springframework.ai.anthropic.AnthropicChatClient;
import org.springframework.ai.chat.ChatResponse;
import org.springframework.ai.chat.prompt.Prompt;
import org.springframework.stereotype.Service;

@Service
public class ClaudeAIService {

    private final AnthropicChatClient anthropicChatClient;

    public ClaudeAIService(AnthropicChatClient anthropicChatClient) {
        this.anthropicChatClient = anthropicChatClient;
    }

    public String chatWithClaude(String userMessage) {
        Prompt prompt = new Prompt(userMessage);
        ChatResponse response = anthropicChatClient.call(prompt);
        return response.getResult().getOutput().getContent();
    }
}
The ClaudeAIService class is a Spring Boot service that integrates with Anthropic Claude AI for generating chat responses.
Key Components:
- Dependency Injection:
- Uses
AnthropicChatClientto interact with Claude AI.
- Uses
- Method
chatWithClaude(String userMessage):- Takes user input as a prompt.
- Sends the prompt to Claude AI via
anthropicChatClient.call(prompt). - Extracts and returns the AI-generated response.
This service enables seamless AI-powered chat responses in a Spring Boot application..
ClaudeAIController.java (REST Controller)
package com.example.controller;

import com.example.service.ClaudeAIService;
import org.springframework.web.bind.annotation.*;

@RestController
@RequestMapping("/api/claude")
public class ClaudeAIController {

    private final ClaudeAIService claudeAIService;

    public ClaudeAIController(ClaudeAIService claudeAIService) {
        this.claudeAIService = claudeAIService;
    }

    @PostMapping("/chat")
    public String chatWithClaude(@RequestBody String message) {
        return claudeAIService.chatWithClaude(message);
    }
}
The ClaudeAIController class is a Spring Boot REST controller that exposes an API endpoint to interact with Anthropic Claude AI.
Key Components:
- Dependency Injection:
- Injects
ClaudeAIServiceto handle AI chat requests.
- Injects
- Endpoint
/api/claude/chat(POST request):- Accepts a user message in the request body.
- Passes the message to
ClaudeAIServicefor processing. - Returns the AI-generated response.
This controller enables AI-powered conversations via a REST API in a Spring Boot application.
6. Testing the API with Postman
Now, let's test our API using Postman.
Step 1: Start the Spring Boot Application
Run the application:
mvn spring-boot:runStep 2: Send a POST Request
- URL:
http://localhost:8080/api/claude/chat - Method:
POST - Headers:
Content-Type: application/json
- Body (Raw JSON):
"Tell me about the future of AI."Step 3: Expected Response
"AI is expected to play a crucial role in various industries, from healthcare to automation, improving efficiency and innovation."7. Running Unit Tests
Let's add a simple test to verify our Claude AI integration.
ClaudeAITests.java
package com.example;

import com.example.service.ClaudeAIService;
import org.junit.jupiter.api.Test;
import org.springframework.beans.factory.annotation.Autowired;
import org.springframework.boot.test.context.SpringBootTest;
import static org.junit.jupiter.api.Assertions.*;

@SpringBootTest
public class ClaudeAITests {

    @Autowired
    private ClaudeAIService claudeAIService;

    @Test
    void testClaudeAIResponse() {
        String response = claudeAIService.chatWithClaude("What is Java?");
        assertNotNull(response);
        assertFalse(response.isEmpty());
    }
}
The ClaudeAITests class is a JUnit 5 test for verifying the integration of ClaudeAIService in a Spring Boot application.
Key Components:
@SpringBootTest– Loads the full Spring Boot application context for testing.- Dependency Injection – Injects
ClaudeAIServiceusing@Autowired. - Test Method (
testClaudeAIResponse) –- Calls
chatWithClaude("What is Java?")to get an AI-generated response. - Uses assertions:
assertNotNull(response)– Ensures the response is not null.assertFalse(response.isEmpty())– Ensures the response is not empty.
- Calls
This test ensures Claude AI returns a valid response when queried.
Run the tests using:
mvn test8. Final Project Directory
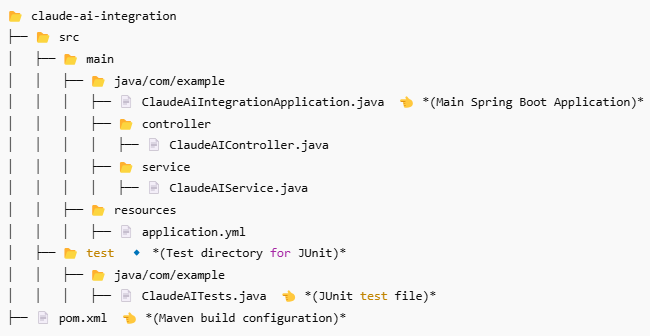
🤖 Integrate Anthropic Claude AI with Spring Boot
Get started with a powerful Spring Boot project integrated with Anthropic Claude AI using Spring AI.
🚀 Clone on GitHub